
How to password-protect your website with Cloudflare Workers
Reading time: 5 min
Last updated
_,.-'~'-.,__,.-'~'-.,__,.-'~'-.,__,.-'~'-.,__,.-'~'-.,_
<TLDR> If your DNS provider is Cloudflare, you can use its Workers feature to add password protection on top of the existing website or API. You don't need to make any changes to the web server configuration or application code. You can enable password protection either manually via Cloudflare dashboard or define it as Infrastructure-as-Code with Wrangler.</TLDR>
Why? #
Sometimes you don't want your website to be open to public. Consider these use cases:
- Restricting access to the staging version of the project you're working on for a client.
- Having a web app accessible over the Internet that only you should have access to.
- Throwing a very basic API protection layer.
- Sharing a file online with limited audience.
Adding a HTTP Basic Authentication is a quick way to enable password protection on a page. But that implies making changes to the configuration and/or code on your server. Either the web server or the application must respond appropriately to unauthenticated requests.
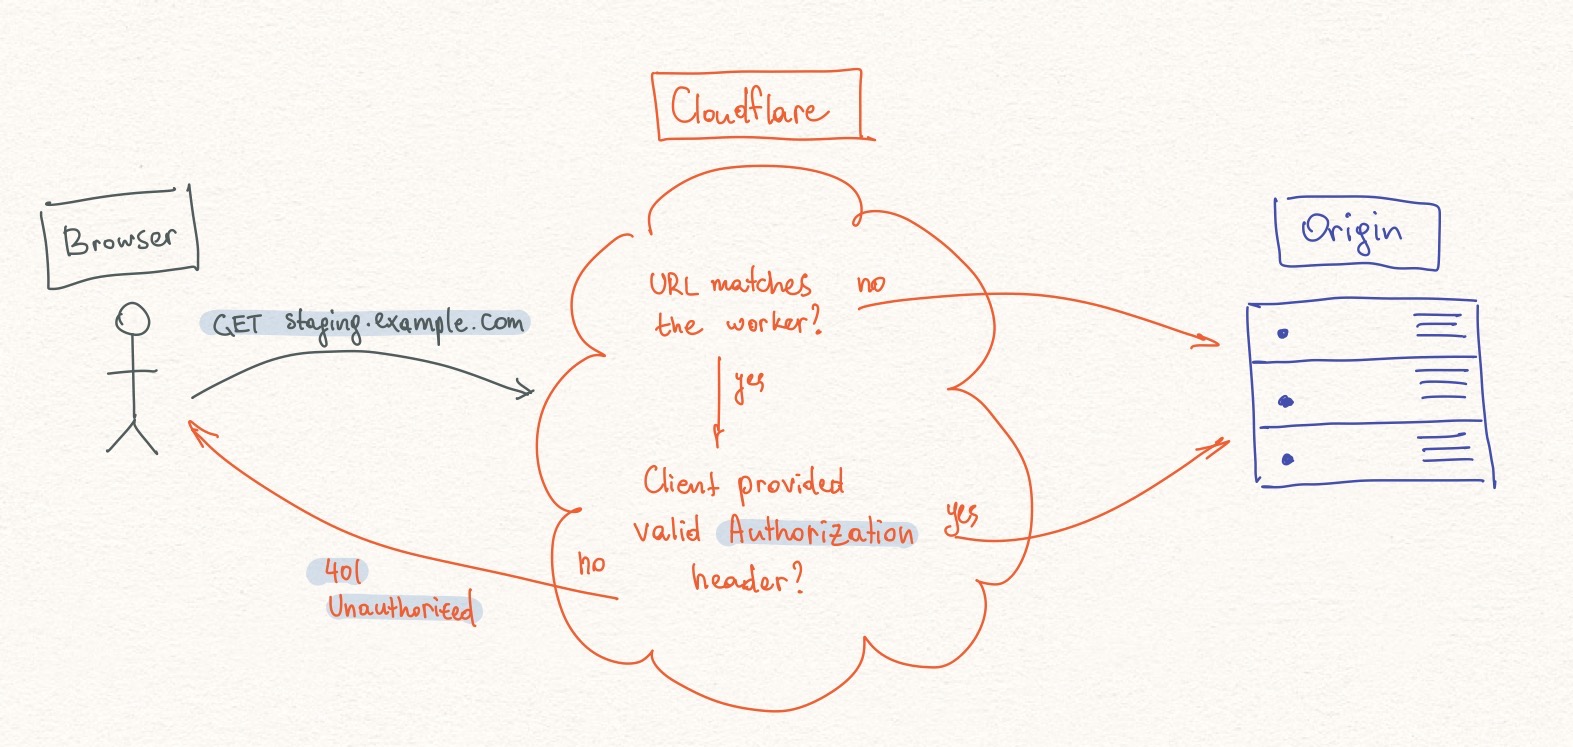
With Cloudflare, you can add HTTP Basic Authorization over an existing website or API without making changes to your origin server.
Note 1: Basic Authentication has no built-in transport security mechanism. It implies credentials will be passed in plain text over the network. Make sure the connection between a client and Cloudflare is encrypted via SSL/TLS.
Note 2: Workers has a generous (100,000 requests/day) free tier but in case of high-traffic scenario it may incur some costs. Workers pricing
Demo #
See https://cloudflareworkers.com/#f5d2cc53bd3d55486ddd14b1eb6e6c83:https://www.google.com/
In this example, to access https://www.google.com/ (origin server) you need to pass basic authentication.
User name: demouser
Password: demopassword
How? #
Prerequisites:
- DNS records of the property you want to protect are hosted at Cloudflare.
- Corresponding DNS record is Cloudflare-proxied (orange cloud ON).
We will deploy a Cloudflare Worker which will guard the resources by checking if visitors are authenticated. If not they will be prompted with a standard browser password input modal.
Worker code #
The code should be self explanatory. On incoming request, it will parse and validate the incoming headers and respond accordingly. You will use this code in the following steps.
/**
 * @param {string} USERNAME User name to access the page
 * @param {string} PASSWORD Password to access the page
 * @param {string} REALM A name of an area (a page or a group of pages) to protect.
 * Some browsers may show "Enter user name and password to access REALM"
 */
const USERNAME = 'demouser'
const PASSWORD = 'demopassword'
const REALM = 'Secure Area'

addEventListener('fetch', (event) => {
  event.respondWith(handleRequest(event.request))
})

async function handleRequest(request) {
  const authorization = request.headers.get('authorization')
  if (!request.headers.has('authorization')) {
    return getUnauthorizedResponse(
      'Provide User Name and Password to access this page.',
    )
  }
  const credentials = parseCredentials(authorization)
  if (credentials[0] !== USERNAME || credentials[1] !== PASSWORD) {
    return getUnauthorizedResponse(
      'The User Name and Password combination you have entered is invalid.',
    )
  }
  return await fetch(request)
}

/**
 * Break down base64 encoded authorization string into plain-text username and password
 * @param {string} authorization
 * @returns {string[]}
 */
function parseCredentials(authorization) {
  const parts = authorization.split(' ')
  const plainAuth = atob(parts[1])
  const credentials = plainAuth.split(':')
  return credentials
}

/**
 * Helper funtion to generate Response object
 * @param {string} message
 * @returns {Response}
 */
function getUnauthorizedResponse(message) {
  let response = new Response(message, {
    status: 401,
  })
  response.headers.set('WWW-Authenticate', `Basic realm="${REALM}"`)
  return response
}
Deploy manually with Cloudflare Dashboard #
If you care about Infrastructure as Code, see Deploy with Wrangler below.
1. Create a worker.
- Go to Cloudflare Dashboard / Account Home /
Workers Create a Worker- Paste the code
Save and Deploy
2. Configure route mapping.
- Go to Account Home / Domain /
Workers Add route- Provide route, e.g.
staging.example.com/* - Select worker
Save
You're set! Now if you open staging.example.com/anything it will prompt you to enter password.
Deploy with Wrangler #
Wrangler is a tool built by Cloudflare to develop, test and deploy workers code. For more details, refer to documentation.
First you need to collect some information from your CF account.
- Account ID.
- Account Home / Domain /
Overviewtab /APIsection /Account ID
- Account Home / Domain /
- Zone ID.
- Account Home / Domain /
Overviewtab /APIsection /Zone ID
- Account Home / Domain /
- API token.
- Account Home / Domain /
Overviewtab /APIsection /Get your API Token/API Tokenstab Create Token- Select
Edit Cloudflare Workerstemplate Account Resources: Select your accountZone Resources: Select your zoneContinue to SummaryCreate Token
- Account Home / Domain /
1. Install Wrangler.
npm install -g @cloudflare/wrangler
2. Generate Wrangler project.
This is where your worker code and the deployment config will be.
wrangler generate basic-http-auth-worker
cd basic-http-auth-worker
3. Update generated Wrangler config.
basic-http-auth-worker/wrangler.toml:
name = "cf-worker-basic-http-auth"
type = "javascript"
account_id = "<YOUR ACCOUNT ID>"
zone_id = "<YOUR ZONE ID>"
route = "staging.example.com/*"
4. Replace worker code.
Worker code is in basic-http-auth-worker/index.js
5. Configure API token.
wrangler config
6. Deploy the worker.
wrangler publish
Again, after all these steps, if you open staging.example.com/anything it will prompt you to enter password.
If you like this type of content you can follow me on Twitter for the latest updates.
_,.-'~'-.,__,.-'~'-.,__,.-'~'-.,__,.-'~'-.,__,.-'~'-.,_